Portfolio Design #03: Content Processing & Auth Flow (API)
Introduction
Behind the UI is an API written in Go. I picked Go over Python because it’s fast, memory-efficient, and great at concurrency. Goroutines make it easy to handle lots of simultaneous requests without the overhead of traditional threads, which matters on a small server. Also, I just really like writing Go.
Tech Stack: - Go: Core language - Chi Router: Lightweight, composable HTTP router - Cloudflare R2: S3-compatible object storage - PostgreSQL: Primary database
The system is designed with two distinct API surfaces, and some SSR endpoints:
- Public API (/api/v0): REST API endpoints for profile, posts, experiences, and tags.
- Admin Interface (/admin): Protected routes for content management and file uploads.
- Public Website (/, /blog, /blog/*): Server-side rendered HTML pages.

API Foundation & Routing
Chi Router Setup
The routing layer uses Chi, providing a composable, middleware-focused approach to routing.
My routes are organized into logical groups:
router.Route("/api/v0", func(r chi.Router) {
    // Public API endpoints
})

router.Route("/admin", func(r chi.Router) {
    // CSRF protection middleware
    r.Use(csrfMiddleware.Middleware)

    // Public auth routes (no auth required)
    r.Get("/login", authHandlers.HandleLogin)
    r.Post("/login", authHandlers.HandleLogin)

    // Protected routes (RequireAuth checks session internally)
    r.Group(func(protected chi.Router) {
        protected.Use(authService.RequireAuth) // Checks session, redirects if invalid
        protected.Get("/", adminHandlers.HandleAdminDashboard)
        // ...
    })
})
This structure allows for: - Route isolation: Each route group can have its own middleware stack. - Middleware composition: Security middleware applies only where needed. - Clear separation: Public vs. admin concerns are distinct.
API Endpoint Implementation
The public API endpoints are implemented using Chi’s standard HTTP handlers with manual parameter parsing and validation. Each endpoint follows a consistent pattern:
Endpoint Structure:
- Path parameters extracted using chi.URLParam()
- Query parameters parsed from r.URL.Query()
- Manual validation and type conversion
- JSON responses encoded with encoding/json
Example endpoint implementation:
router.Get("/api/v0/posts/{slug}", func(w http.ResponseWriter, r *http.Request) {
    slug := chi.URLParam(r, "slug")
    if slug == "" {
        http.Error(w, "slug required", http.StatusBadRequest)
        return
    }

    post, err := config.Database.GetPostBySlug(r.Context(), nil, slug)
    if err != nil {
        http.Error(w, err.Error(), http.StatusNotFound)
        return
    }

    w.Header().Set("Content-Type", "application/json")
    json.NewEncoder(w).Encode(post)
})
API Versioning “Strategy”
The API currently uses a /api/v0 prefix. This allows future-proofing the API structure for versioning. Future versions can coexist, where /api/v0 and /api/v1 can run simultaneously, allowing gradual migration.
I did this as more of a good practice, since starting with an initial /api/{version} will make it easier in case I do change the architecture in the future. In my ideal infinite-money setup, this project would be a micro-service structure, allowing for different services to scale separately and handle resiliency.
Middleware Stack
The middleware stack processes each request in a specific order, each layer adding functionality or security.
Request Processing Pipeline
These are Chi-provided middleware I used on the router.
Logger Middleware - Adds unique request IDs to every request - Logs request method, path, and response status - Enables request tracing across the application
Panic Recovery Middleware - Catches panics and returns 500 errors instead of crashing the app - Logs panic details for debugging - Prevents server crashes from unhandled errors
Security Middleware
I also implemented some middleware to aid with security policies.
Content Security Policy (CSP)
CSP headers prevent XSS attacks by controlling which resources are allowed to be loaded. Instead of a single statically-defined CSP, I created three separate “modes”:
- Static Mode (default) - Hash-based CSP
- Pre-computed SHA256 hashes for inline scripts and styles
- I have a mix of self-hosted scripts under
/staticand inlined ones defined in Go, with a hash calculated at build-time for each. Usingtempl, I can then easily import the scripts, as needed. - The purpose of the separation was because I wanted some of the simpler scripts to be inline to avoid a network hop to fetch on-load.
- I have a mix of self-hosted scripts under
- No
noncegeneration needed. - Strictest security for static content.
- Pre-computed SHA256 hashes for inline scripts and styles
- Dynamic Mode - Hash & Nonce
- Used for pages with dynamic content (e.g., analytics dashboard)
- Generates a cryptographically secure
nonceper request usingcrypto/rand - Allows dynamic scripts while maintaining security
- Mermaid Renderer Mode - Relaxed CSP
- Isolated
iframecontext for Mermaid diagram rendering - Allows inline styles needed by Mermaid
- Completely isolated from main page security context
- Isolated
Note: Client-side mermaid rendering support may be removed or re-implemented in the future due to its heavy footprint.
The CSP middleware then:
- Detects page type from request path
- Injects a generated nonce into request context for template access
- Builds appropriate CSP header string
CSRF Protection
CSRF middleware protects state-changing operations (POST, PUT, DELETE, PATCH) by requiring a token that matches the session. This was only required for admin pages, which have content-management forms.
Token Generation: - 32-byte cryptographically random token - Base64 URL-encoded - Stored in session (server-side)
Token Validation:
- On requests, checks header (X-CSRF-Token) for AJAX requests
- Falls back to form field (csrf_token) for form submissions
- Constant-time comparison to prevent timing attacks
- Special handling for multipart forms (file uploads)
Multipart Form Handling:
When a file upload is detected, the middleware:
1. Parses multipart form
2. Extracts CSRF token from form data by reading the first 50 MB
- The memory read for the token could be lessened, but I wanted to be safe.
- I believe I can send the token as a header instead of the body, which would avoid having to read the file to parse it.
3. Validates against session token
4. Allows request to proceed if valid
This ensures file uploads are protected while handling the complexity of multipart encoding.
Middleware Execution Order
- Logger - Track all requests
- Recoverer - Catch any panics
- RequestID - Request tracing
- CSP - Before handlers that need nonces
- CSRF - On specific route groups (admin routes)

Request Processing & API Design
Public API Endpoints
The public API provides read-only access to portfolio content:
- Health Check (
GET /api/v0/health) - Service health status - Profile (
GET /api/v0/profile) - Portfolio owner information - Experiences (
GET /api/v0/experiences) - Work/education history - Posts (
GET /api/v0/posts) - Blog posts with filtering - Tags (
GET /api/v0/tags) - Unique tags from all posts
Each endpoint follows a consistent pattern with explicit parameter parsing and validation. The system uses a cache-first approach to minimize backend database load.
Pagination & Filtering
The posts API supports sophisticated filtering and pagination, which is useful for the /blog page:
Query Parameters:
- status - Comma-separated list (draft, published, archived)
- tags - Comma-separated tag list
- search - Full-text search on title and excerpt
- sort - Sort order (asc/desc by date)
- limit - Items per page (1-50, default 12)
- cursor - Pagination cursor for next page
Cursor-Based Pagination: Instead of offset-based pagination, the system uses cursor-based pagination: - Cursor encodes the last item’s position - Next page starts after the cursor - More efficient for large datasets - Consistent results even if data changes during pagination
* Admittedly, my blog will never reach the scale at which performance issues would be hit, but the last point above about consistent data was my driving factor. Especially implementing infinite-scroll.
Error Handling & Resilience
Error Response Strategy
The system uses standard HTTP error responses for consistent API behavior:
Error Types:
- 503 Service Unavailable - Database connectivity issues
- 404 Not Found - Resource does not exist
- 400 Bad Request - Invalid input
- 500 Internal Server Error - Server errors
Error Handling Pattern:
if err != nil {
    if errors.Is(err, database.ErrNotFound) {
        http.Error(w, "Resource not found", http.StatusNotFound)
        return
    }
    log.Error().Err(err).Msg("database error")
    http.Error(w, "Internal server error", http.StatusInternalServerError)
    return
}
Structured Logging: All errors logged include the following context to help with debugging: - Request ID for tracing - Error message and stack trace - Relevant request parameters - Component identification
Partial Failure Handling
Some operations fail gracefully, solely logging for monitoring: - Non-critical operations (like cache invalidation and insertions) don’t block requests - Realistically, since I monitor cache hit-miss ratios, it should become easily apparent without requiring log browsing. - User experience is prioritized while maintaining observability
This approach ensures the API remains responsive even when helper operations encounter issues.
Media Upload Processing Pipeline
The upload pipeline handles file uploads with validation, processing, and error handling.
Multipart Form Handling
File uploads arrive as multipart/form-data:
- Size Limit: 50MB maximum per upload
- I don’t expect to have larger-than-this content, and I’m aiming not to pass this. I may increase in the future if I upload some videos and don’t want to lose quality by encoding it.
- Another reason for this limit is due to the non-streaming nature of uploads, which reads the media into memory instead of streaming it. With my limited resources, in order to safely support larger file sizes, I’ll need to stream the uploaded data.
- CSRF Protection: Token validated before processing
- Form Parsing: Extracts file and metadata
File Processing Steps
1. Validation
Before processing, the system validates: - File Header: Ensures file object exists - Filename: Must be non-empty - File Size: Read into memory for processing (within 50MB limit)
Early validation prevents processing invalid uploads and provides clear error messages.
2. MIME Type Detection
MIME type detection uses a two-tier approach:
Primary: Magic Number Detection
- Reads file bytes and detects MIME type from file signatures
- More reliable than extension-based detection
- Prevents spoofing (e.g., .exe renamed to .jpg)
- Using the mimetype library.
Fallback: Extension-Based
- If above fails, then we fallback to file extension
- Maps common extensions to MIME types
- Final fallback: application/octet-stream
This ensures accurate content type identification for proper handling and security.
3. Resource Type Classification
Based on MIME type, files are classified:
- Image - image/* MIME types
- Video - video/* MIME types
- Audio - audio/* MIME types
- Document - Everything else (PDFs, documents, etc.)
Resource type determines:
- URL generation (images get Cloudflare optimization)
- Display handling in UI (e.g., <img>)
4. Storage & Record Creation
Files are stored with UUID-based keys to prevent enumeration attacks. An artifact record is created with processing status to track upload progress and handle failures gracefully.
5. Upload & Status Updates
After successful upload:
- Status updated from processing → completed or failed
- Direct-to-storage URL generated based on resource type and privacy
- Response returned to client with artifact details
Post Association & URL Generation
Post Association:
An post_id parameter links uploaded artifacts to a post. This is currently so that on post deletions, the post’s uploaded media can be removed as well.
URL Generation:
- Public Artifacts: Direct storage URL with optional image optimization
- Images get automatic format and width optimization
- Other files served directly
- Private Artifacts: Internal URL requiring authentication
- Format: /attachments/assets/{uuid}
- This currently isn’t implemented, but the idea is that a private bucket will exist requiring signed URLs. The only way to access would be through the proxied /attachments/assets/{uuid} path that would generate the credentials required, instead of direct storage connections.
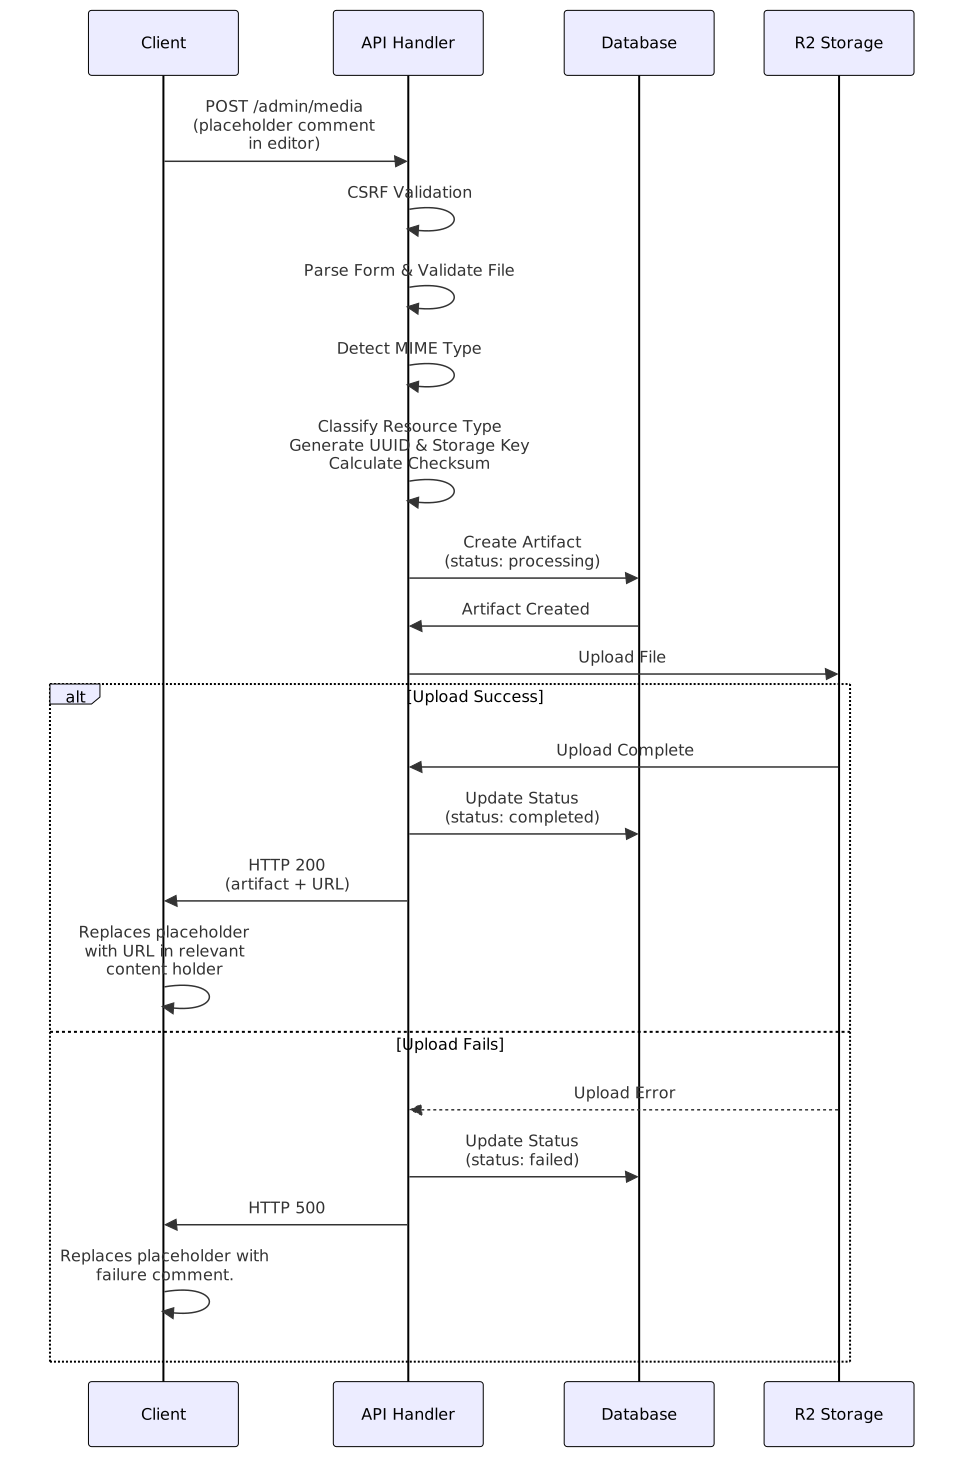
Note: No complex requirements such as message buses / queues were required for my needs, which is a small blog.
Resume Handling (Specialized Upload)
Resume uploads follow a simpler pattern than general media. A resume is a special case: single file and always public.
Fixed Naming:
- Always stored as resume.{ext}
- No need for UUID (not enumerable, single file)
- This allows for any file type to be used as a resume.
- Single resume per profile
- Predictable URL structure
Replacement Logic: - New upload replaces existing resume - Old file cleaned up automatically
Conclusion
Security First: - Multiple layers of protection (CSRF, authentication, MIME validation) - Defense in depth - Secure by default
Performance Focused: - Cache-first strategy with pre-rendered HTML - Efficient resource usage through connection pooling - Minimal backend load - Upload limits to prevent resource exhaustion
Maintainable: - Clear separation of concerns - Explicit validation and error handling - Comprehensive error handling
The system is designed to scale while maintaining security and performance, with clear extension points for future enhancements.
In the next portfolio design post, I’ll go over the data storages used, and their caching strategies for performance.